Talk to our experts
Adobe Commerce (Magento 2) A/B feature allows online merchants and retailers to create multiple variants of their online stores accessible to a custom group of target customers. There are several benefits of A/B testing like to increase user engagement, reduce bounce rates, increase conversion rates, minimize risks, and create meaningful content that caters to the personalized needs of your customers. Running an A/B test can have significant positive effects on your site or mobile apps.

Now let’s understand why Magento 2’s A/B testing is amazing:
- Built into Magento, so you don’t need any plugins or custom development.
- If you’re using The Magento 2 Enterprise edition, the set up is ready for you.
- Test up to 10 variants of a page to see which ones your customers like the most.
- Test against any metric that you can track in Google Analytics, including bounce rate, page views, add to cart rate, and more.
- Designed to test on any product, category or CMS pages.
- No ‘flicker’ effect that you get with some A/B testing tools when they load another variant.
What is A/B testing?
A/B testing is the practice of sending proportions of your audience two versions of a webpage in order to compare the difference in engagement or performance. Another variant of A/B testing, MVT (Multivariate testing) is similar but doesn’t restrict to two variants but multiple versions. With MVT, you can create up to 10 variants to find the best-performing version of your store pages.
Why should PO (Product Owner)/Business Owners choose A/B testing?
The ultimate goal for any business is to generate revenue or increase the current revenue. A/B testing can most likely help to grow the revenue margins. Let’s understand how A/B test can do this.
- Higher the testing frequency, the more we learn what works and what does not for our customers.
- Build a culture of learning and improvement.
- Before the final release, we will know which design customers like most.
- We can reduce design iterations as well based on the customer most liked design.
How does A/B testing work?
There are two types of A/B testing for eCommerce stores: client-side and server-side testing.
Client-side testing: In this form of A/B testing, once a shopper requests a web page, your server delivers it. However, the experimentation tool uses JavaScript on the shopper’s web browser that changes/personalizes the content being delivered. This way, the end consumer, views a web page that is customized as per the targeting rules. Since this format can be implemented during browser-level JavaScript execution, you can only test superficial aspects like the colour theme, layout, etc. through it.
Server-side testing: In this form of A/B testing, a customer requests for a web page and your server delivers it. However, the experimental tool works on the server-side to determine the best-fit version of a web page based on targeting rules and then delivers that variant to the user.
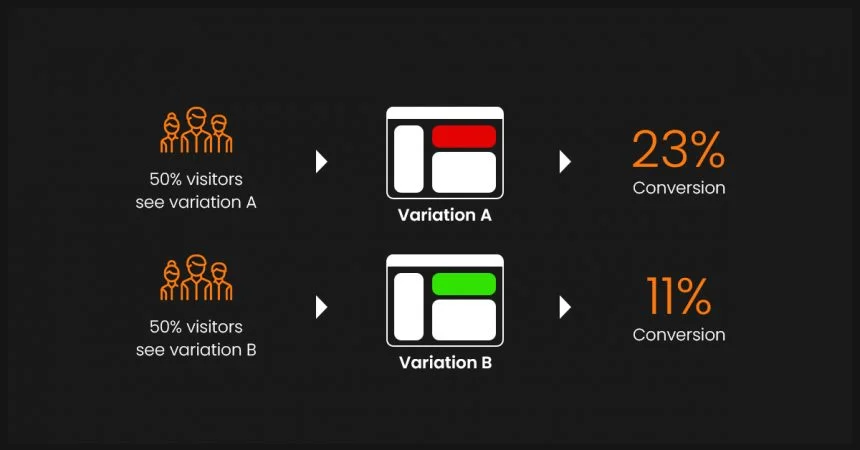
For example, you can send 50% of your visitors version A and the rest version B of a web page. You can then test them for performance and the goal setup prior to executing the test (conversion rate, CTR, sales, product variant, etc). The one that achieves a score above the threshold can be implemented site-wide.
What can you test with A/B testing?
In terms of your eCommerce website, here a few things you can test:
- Page layouts
- Different pages like homepage, product page, category page, landing page & product descriptions
- CTA copies and button placement
- Product photos and videos
- Push notifications
- Keyword placement and meta descriptions
- Social proofs like reviews, testimonials, social media posts
- Pop-ups
You can set up a process of testing different items of your eCommerce website and then incrementally go around it. For example, you can first start with page layouts and then test pop-ups, push notifications, etc.
Let’s start A/B testing with Magento 2: The Steps
Before starting with the actual test, let’s summarize what we will do in this test and what we will achieve after this test is successfully executed. We will create a service CMS page with two variants A & B, expected results we will compare with bounce rate of the page.
Pre-requirements before beginning the test: Google Analytics should be configured and active on your Magento site and should be Magento 2 enterprise edition. Followed the below steps to prepare for the first A/B test.
Step 1: Lets create CMS page
1. Go to Magento 2 Admin > Content> Pages
2. Click on the “Add New Page” button.
3. Fillup the all required fields & save the CMS page.
Note : Repeat the step 1 for creating the second CMS page but make sure the URL will be different for both the CMS pages.
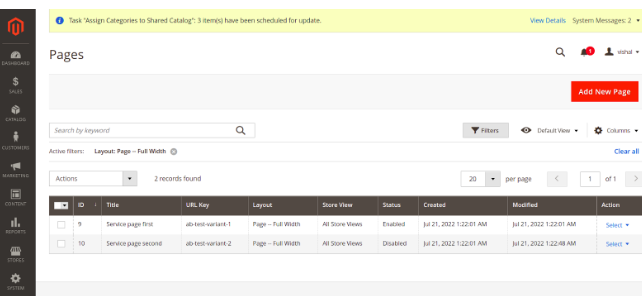
After followed by all above steps CMS page display in grid looks like this:

Step 2: Configure Google Analytics Content Experiments for your test
1. Log in to your Google Analytics account.
2. Select your live site account and go to Behavior > Experiments.
3. You are now presented with the Experiments Overview.
4. Click New Experiment.
Step 3: Create your experiment

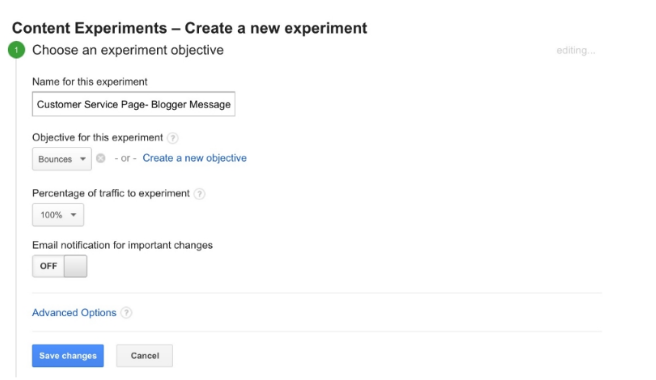
Creating a new experiment in Google Analytics:
1. Enter the name of your experiment.
2. Select the objective for the test. (Example: Bounces)
3. Select the percentage of traffic you are going to send to the different variants.
4. You can turn on email notifications for important changes.
Note : If your change is small and you want quick answers, then send a high percentage of traffic. If your company is new to A/B testing ,or if it’s a risky change, then reduce the percentage.
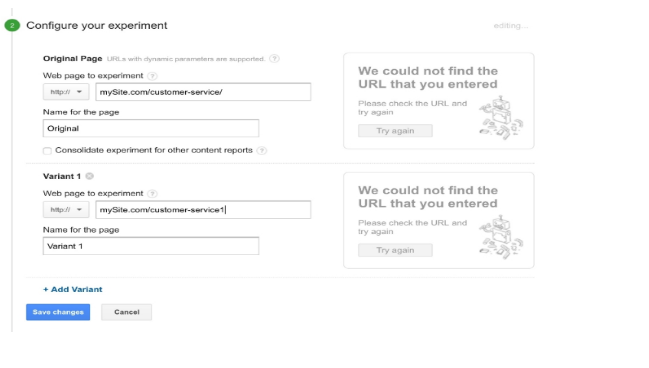
Setting up the test:

How do I confirm the A/B test is working?
Use Google Chrome’s incognito or Firefox’s private browsing mode to look at the page you are testing. This will make Magento think you are a new user and give you a different version of the page.
If you look at the URL, you will also be able to see that Google Content Experiments has added some extra details to the web url. The ‘utm_expid’ shows that Google has successfully included this page as part of its testing.
Wait for the results
By doing A/B testing, you have done more than most companies do, to understand your users. Hopefully, you will have discovered something new to improve your pages’ performance.

Vishal Bansal
Vishal Bansal is a professional with an IT experience of 10 years currently serving as a Tech Lead at Ranosys Technologies. He has played a pivotal role in eCommerce practice development at Ranosys Technologies. Vishal Bansal is Adobe Certified Professional—Adobe Commerce Developer.


